Phytoplankton consists of one-celled marine and freshwater microalgae and other plant-like organisms. They are used in the production of pharmaceuticals, diet supplements, pigments, and biofuels, and also used as feeds in aquaculture. Phytoplankton are cultured to feed bivalve molluscs (all life stages), the early larval stages of crustaceans, and the zooplankton (e.g., rotifers, copepods) that are used as live food in fish hatcheries.
Flagellates and diatoms are two important types of phytoplankton at the base of the food chain. They manufacture cellular components through the process of photosynthesis, taking up carbon dioxide and nutrients from the water and using light as an energy source.
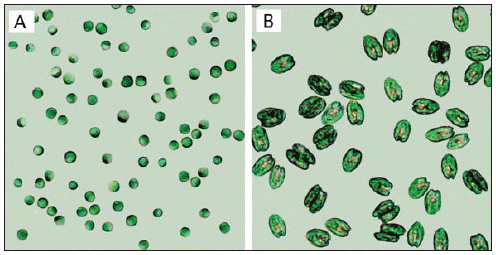
The microalgae used as feed in hatcheries vary in size, environmental requirements, growth rate, and nutritional value (Fig. 1, Tables 1 and 2) (Helm et al., 2004). When selecting a species for culture, it is important to take all of these parameters into consideration. Most hatcheries grow a variety of species that serve different needs throughout the production cycle with respect to size, digestibility, culture characteristics, and nutritional value (Muller-Feuga et al., 2003).
Culture conditions can vary widely—from outdoor ponds or raceways with nutrients added to promote a bloom of the natural microalgae, to monocultures reared indoors under controlled environmental conditions. This paper focuses on the monoculture of microalgae under clearly defined environmental conditions and production protocols.
Cell Volume, Organic Weight, and Gross Lipid Content of Some Commonly Cultured Phytoplankton Species used in Bivalve Mollusc and Fish Hatcheries (Helm et al., 2004).

Microalgal culture facilities typically use seawater enriched with nutrients—primarily nitrates, phosphates, essential trace elements, vitamins, and, in the case of diatoms, silicates. Water used to culture microalgae should have similar chemical composition to that used to culture the animals, and it should be pretreated. Some laboratories use synthetic seawater for small-scale cultures, but it is prohibitively expensive for large-scale production in commercial hatcheries.
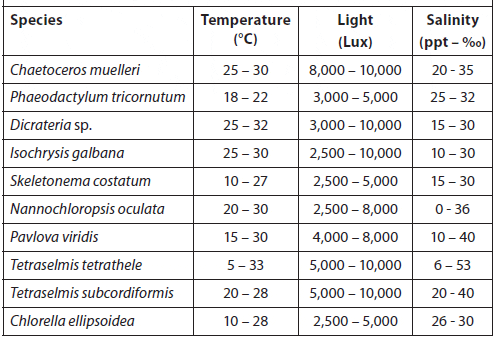
Temperature, Light, and Salinity Ranges for Culturing Selected Microalgae Species (Hoff and Snell, 2008).
Population Dynamics
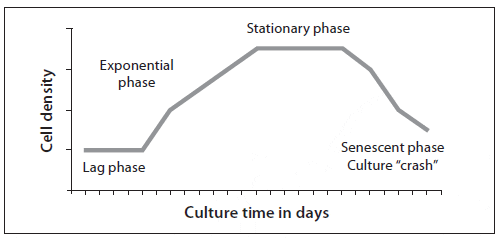
Algal cells from a starter culture are inoculated into a larger volume of treated, enriched water to reach an initial low density of about 30 to 100 cells/?L. For the first 2 to 3 days the cells become acclimated to the new medium, grow, and begin cell division. This phase, termed the lag phase, varies in length depending on the amount of inoculum used (initial cell density), alga species (inherent division rate), irradiance, and temperature (Fig. 2). Once acclimated, the algal cells divide at an accelerating rate, and the population increases logarithmically; this exponential growth phase lasts 4 or more days. The cells are usually harvested for feeding during this phase. The exponential growth phase is followed by the stationary phase, when cell division declines and there is no further increase in cell density. This decreased growth is the result of changes in the concentration of nutrients, self-shading (high cell density reduces the amount of light available to algal cells), and changes in the culture medium, such as increasing pH and the build-up of metabolic waste products or substances called autoinhibitors that are secreted by some species (mostly diatoms). As the culture ages, the stationary phase is followed by a senescent phase in which the density of the culture will decline.
Stationary phase algae should not be used for larviculture because although the algae may be nutritious, as they die the cells rupture and bacteria can proliferate (including some pathogenic bacteria such as Vibrio spp.). The wise culturist knows that the line between feeding larvae and poisoning them can become blurry as algal cultures age.
The Culture Environment
When designing a microalgal production system, consider which species is most appropriate for the intended use (e.g., size and nutritional characteristics). Also consider yield, operating costs, and reliability. Microalgal culture is the most expensive and technically challenging aspect of all hatchery operations. The cost of producing microalgal feed ranges from $100 to $400 per dry kilogram ($45 to $180 per pound) of microalgal biomass (Wikfors, 2000). Algal culture accounts for about 40 percent of the cost of rearing bivalve seed to a shell length of 5 mm in a land-based hatchery (Ukeles, 1980).
Hatcheries use either intensive indoor culture with artificial lighting or extensive outdoor culture in large tanks, raceways, or ponds with natural lighting. Some hatcheries use a combination of the two. Intensive indoor systems are expensive and labor intensive, but they are more reliable and more productive (relative to space requirements) than outdoor systems. Open ponds and raceways are also more prone to biological contamination or other water quality problems. As one might imagine, the potential for “culture crashes” increases as the degree of control over environmental factors such as temperature, illumination, nutrient availability, pH, and potential contamination decreases.
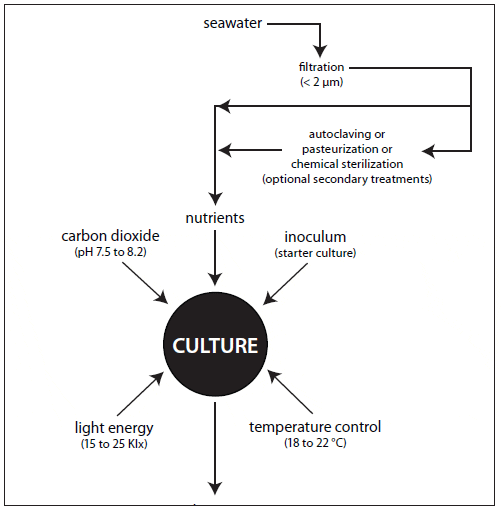
The nutritional value of algae is affected by culture age and growth phase, light characteristics and intensity, nutrient limitation and source, and cell density (Depauw and Persoone, 1988). Whether intensive or extensive, microalgal culture requires filtered and treated water, nutrients, a light source, aeration and mixing, temperature/ salinity control, pH control, and a high-quality inoculum to ensure a satisfactory yield (Fig. 3).
Filtered and Treated Water
Pretreatment of water, whether saltwater or freshwater, is one of the most important steps in successful microalgal culture. Culture water should be free of suspended solids, plankton (e.g., protozoans, ciliates and other algae species), bacteria, unacceptably high concentrations of dissolved organic compounds (DOC), dissolved metals, and pesticides.
Pretreatment typically includes mechanical and chemical filtration, sterilization or disinfection, and nutrient enrichment. The choice of treatment should be based upon species cultured, volume requirements, and cost.
Mechanical filtration. Mechanical filtration removes suspended solids, plankton and bacteria and is usually used with the other forms of treatment described below. The type of mechanical filtration used depends on the condition of the incoming water and the volume of water to be treated. A mechanical filter usually consists of a series of filters that remove increasingly smaller particles—sand filters or polyester filter bags (20- to 35-?m), followed by cartridge filters (10-, 5-, 1-?m) or diatomaceous earth (DE) filters. Small volumes of seawater can be filtered to remove bacteria using 0.22- or 0.45-?m membrane cartridge filters.
Chemical filtration. Dissolved inorganic and organic compounds (DOC), metals, pesticides, and other contaminants can prevent or retard microalgal growth, although detecting them can be complicated and costly. Activated carbon (charcoal) filtration is helpful in reducing DOC, while deionization resins are effective in removing metals and hydrocarbons.
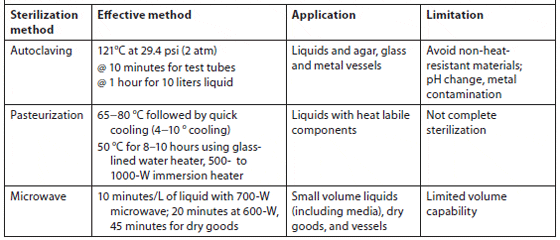
Heat sterilization. Pre-filtered seawater can be sterilized by autoclaving at 1.06 kg/cm2 for 20 minutes. Autoclaving is most suitable for small volumes, while batch or continuous pasteurization at 65 to 70 °C is used for large volumes. Pasteurization at 50 °C for 8 to 10 hours is also effective; a glass-lined water heater or 500- to 1,000-W submersion heater can be used. Microwave sterilization is useful for small volumes of pre-filtered seawater (1 to 5 ?m for 8 to 10 minutes per 1 to 1.5 L using a 700-W unit). Nutrients can be added before microwaving since the temperature will not exceed 84 °C (181 °F) (Hoff, 1996). Bellows and Guillard showed that using a 1.2-ft3, 700-W microwave on high power would effectively kill microalgae in 5 minutes, bacteria in 8 minutes, and fungi in 10 minutes in a volume of 1.5 L of filtered (and unfiltered) seawater (Table 3).
Chemical sterilization. Chlorination is the simplest and most common method of chemical sterilization for culture volumes of at least 4 L. Pre-filtered seawater can be sterilized with sodium hypochlorite solution at 2.5 mg/L free chlorine by adding 1 to 5 mL of household bleach (5% sodium hypochlorite) per liter of seawater. Granular swimming pool chlorine is also effective; a dosage of 1 ounce (28 g) to 500 gallons (1,875 L) yields a similar concentration of chlorine as liquid bleach. Sterilization occurs in a short period of time, usually 10 to 30 minutes, although many culturists suggest a longer time (12 hours or overnight) for a margin of safety. Before use, neutralize the residual chlorine by adding an excess of sodium thiosulphate solution (Na2S2O3 · 5H2O). If 250 g of sodium thiosulfate is dissolved in 1 liter of water, then 1 mL of the sodium thiosulfate solution added for every 4 mL of bleach used is sufficient to eliminate residual chlorine (dechlorination). Common swimming pool chlorine test kits can be used to determine the presence of residual chlorine, but they do not give a precise measure of chlorine concentration; as a general practice, additional sodium thiosulfate solution should be added if there is any indication of residual chlorine.
Summary of Heat Sterilization Types, Effective Methods, Application, and Limitations (Kawachi and Noël, 2005)
Ultraviolet irradiation (UV) and ozone (O3) disinfection. Either UV or ozone can be used to disinfect culture water, although both are most effective after mechanical filtration has removed suspended particulates. It should be noted that “sterilization” is defined as the absolute destruction of all microbial organisms (including bacterial spores), while “disinfection” does not eliminate all microbes but reduces their numbers to a level where the risk of infection is small enough to be acceptable.
UV is the more common of the two, largely because it does not leave concentrations of hazardous by-products. Ozone at high levels can produce chloramines, which are toxic to marine animals. Ozone released into the air can be a safety hazard (if you can smell a faint chlorine smell, residual ozone is present and may be hazardous to your health).
Ozone is a strong oxidizing agent that is particularly effective in removing dissolved organics, pesticides, color and nitrates. It is highly unstable and quickly reverts to O2, but it is also highly corrosive and must be handled with special materials. In-line ozone generators are the most common and usually have monitors/controls to provide an adequate level of ozone yet avoid residual build-up. However, because there is a risk of introducing ozonated water into the culture system, as well as safety concerns for hatchery staff, ozone is not recommended for operators who lack experience and the monitoring equipment to properly manage ozone levels.
Ultraviolet radiation (germicidal energy) is an efficient, simple and reliable way to kill microorganisms in culture water. With proper exposure in clear water, ultraviolet light kills a microorganism by penetrating its cell wall and destroying its nuclear material. Low-pressure mercury vapor UV bulbs are best suited for disinfection because their spectral wavelength (254 nm) is close to the most efficient germicidal wavelength (265 nm). However, the killing power of UV is affected by turbidity/coloration of the incoming water, distance from the source, exposure time (flow rate), species, and age of the bulb (some lights age rapidly, losing as much as 40 percent of their wattage after 6 months). Minimum dosages vary widely for different microorganisms: 15,000 ?watt-sec/cm2 for most bacteria, 22,000 ?watt-sec/cm2 for water-borne algae, 35,000 ?watt-sec/cm2 for bacteria/viruses, 100,000 ?watt-sec/cm2 for protozoans, and as much as 330,000 ?watt-sec/cm2 for Aspergillus niger (mold) (Depauw and Persoone, 1988).
Wattage and flow rate are the most important factors in achieving UV sterilization; the slower the flow rate, the higher the kill rate for a given bulb wattage (Escobal, 1993). For example, a 40-watt mercury vapor bulb with a flow rate of 500 gallons per hour in a 2-inch-diameter pipe will deliver approximately 11,530 ?watt-sec/cm2. Increasing the pipe diameter to 3 inches (thereby reducing flow rate) will increase the dosage to 17,530 ?watt-sec/cm2; cutting the flow rate in half in that 3-inch pipe further increases the dosage to 34,340 ?watt-sec/cm2 (Hoff et al., 2008).
Nutrient Enrichment
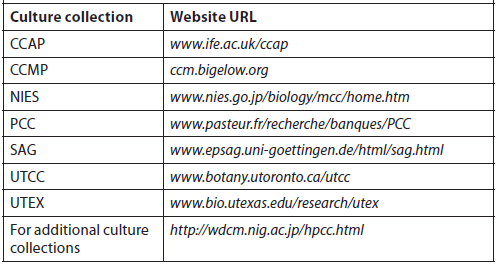
The objective of culturing microalgae is to obtain the highest cell densities in the shortest period of time, and natural concentrations of nutrients in freshwater and seawater are usually insufficient to support high algal yields. Although trace elements are usually found in sufficient quantities, macronutrients are in short supply (usually phosphorus in freshwater and nitrate in saltwater). Several nutrient enrichment media containing soil extract, nitrates, phosphorus, trace elements, and vitamins have been described for freshwater and saltwater (Creswell, 1993). Of the nutrient media formulations used to culture marine microalgae in laboratories and hatcheries, Guillard and Ryther’s F/2 media is the most widely used, and a pre-mixed solution is available from a variety of vendors (Table 4). There are dozens of culture media recipes, many of which were formulated specifically for certain types/species of microalgae and cyanobacteria. A good reference is Algal Culturing Techniques, edited by R. A. Anderson. Table 5 lists services that have culture medium recipes on their websites.
Guillard’s F/2 Media used to Culture Marine Microalgae (Guillard, 1975).
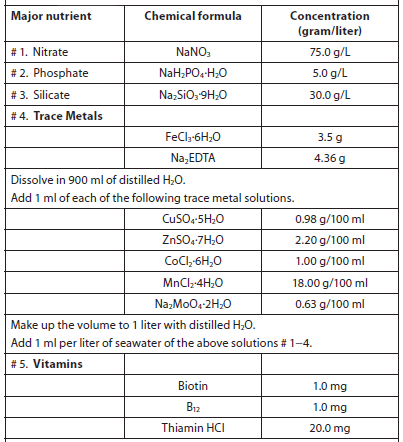
Add 0.5 ml of vitamin solution for every 1 liter of seawater.
Major Service Culture Collections with Culture Medium Recipes on Their Websites (Anderson, 2005).
Light Source
Light is the energy source that drives photosynthesis to convert nutrients into algal biomass. Maximum culture depth and cell density are the primary variables regulating the efficient use of light (Richmond et al., 1980). Light intensity, spectral characteristics, and photoperiod are the components of an illumination regime. Indoor microalgal facilities usually use fluorescent “cool white” bulbs (2,500 lux), while outdoor systems and greenhouses use ambient sunlight in combination with fluorescent or metal halide bulbs to provide evening illumination. The spectral characteristics of “cool white” bulbs are not ideal for intensive microalgae production; bulbs with enhanced red and blue wavelengths (Gro-LuxTM) support higher yields. The age of the bulb is also important, as the spectral characteristics and luminosity change over time; bulbs should be replaced at least annually.
Irradiation of 2,500 to 5,000 lux (250 to 500 footcandles) is optimal for microalgae photosynthesis, with a maximum of 10,000 lux (Escobal, 1993). Guillard (1975) recommended 3,500 and 4,500 lux for stock culture of Thalassiosira pseudonana under continuous and 14 hours per day illumination, respectively. In indoor facilities, bulbs should be 6 to 10 inches from stock cultures; if possible, the ballasts should be outside the culture room to help maintain temperature control.
Internally illuminated culture vessels are costly to construct but inexpensive to operate. Mounting the lamps inside a glass or clear plastic cylinder within the culture vessel reduces the distance the light must travel to penetrate the culture. Culture cylinders with internally mounted lights typically produce as much as cultures with three times the volume.
Metal halide lamps (750 to 1,000 W) are usually used to illuminate larger cultures (1,800 liters or more), and since they generate considerable heat, they should be placed at least 12 inches above the surface in open, well-ventilated greenhouses. If natural light is being used for large-volume cultures in greenhouses, it is best to use the morning sun, with 40 percent shade cloth on the west side of the building and 60 percent shade cloth down the middle of a northsouth oriented building, especially in summer.
Although most commercial light meters measure “lux,” many references in the literature related to light requirements for phytoplankton culture prefer to express optimum irradiance in terms of “Photosynthetically Active Radiation” (PAR), which is expressed as ?mol photons · s-1 · m-2, radiation within wavelengths of 400 to 700 nm. Converting lux values to PAR depends on the type of lamp and its spectral characteristics. Multiply lux by the following conversions for PAR:
- incandescent = 0.019
- metal halide = 0.014
- cool white flourescent = 0.013
- daylight flourescent = 0.014
- GRO flourescent = 0.029
- clear day sunlight = 0.018
(source: http://www.egc.com)
Artificial light is usually preferred over sunlight. With sunlight, the duration and intensity are not easily controlled, which may cause overheating, insufficient irradiance, or photoinhibition if the light is too intense for too long (Escobal, 1993). Artificial lighting can be controlled with a simple timer or light monitor and should be set for a minimum of 16:8 hours light/dark per day (minimum) to 24-hour illumination (maximum) for indoor cultures. Although artificial lighting can be precisely controlled in terms of quality and quantity, it is costly and accounts for almost 95 percent of the cost to culture microalgae (Muller-Feuga et al., 2003).
Temperature Control
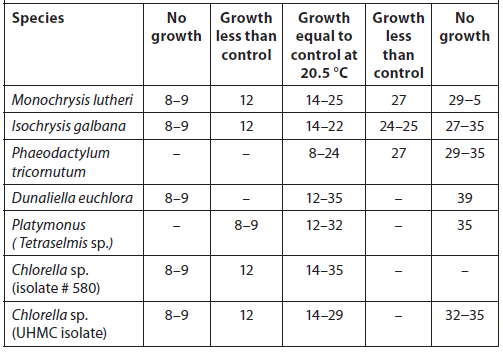
Because most of the microalgae species preferred by culturists are tropical/subtropical, most strains grow best at temperatures ranging from 16 to 27 °C (60 to 80 °F). The optimum is about 24 °C (75 °F). Ukeles (1976) compared the growth response of several microalgae species to temperature (Table 6). The optimum temperature for growth will vary with species, and to some extent is a complex factor that depends on other environmental conditions. Cultures should be maintained at the lowest temperature that is consistent with good yield to avoid encouraging bacterial growth. When considering temperature characteristics for an enclosed culture room, one should consider: 1) the size of the room, 2) heat sources (such as lights and ballasts), and 3) the volume and temperature of air pumped into the culture vessels.
Growth Response of Different Microalgal Species to Various Temperatures (°C). Growth Rates are Relative to Performance of a Control Cultured at 20.5 °C (Ukeles, 1976).
Aeration and Mixing
Aeration is important for microalgal culture because: 1) air is a source of carbon (from CO2) for photosynthesis; 2) CO2 provides essential pH stabilization; and 3) physically mixing the culture keeps nutrients and cells evenly distributed, reduces self-shading and/or photoinhibition (a decrease in photosynthesis due to excess light), and avoids thermal stratification in outdoor systems. Air diffusers (airstones) create small bubbles that maximize oxygen/ CO2 transfer, and they are frequently used for smallvolume cultures. In larger culture containers, fine bubbles from air diffusers create spray and foam that can promote bacterial growth; larger bubbles (no airstones) actually do a better job of mixing the culture with minimal foaming. Common alternatives for mixing larger volume cultures include jet pumps, paddle wheels, continuous recirculation, and air-lift pumps (Persoone et al., 1980).
Carbon dioxide (CO2) source and pH control
Carbon dioxide plays a dual role in microalgal culture. It provides a source of carbon to support photosynthesis, and it helps maintain pH at optimum levels (7.5 to 8.2 for marine species). As culture density increases, more carbon is consumed through photosynthesis, reducing CO2 concentration and causing the pH to rise. At about pH 10 some nutrients will precipitate, algal growth will be retarded, and the culture could completely collapse. This can be prevented if the pH is maintained by introducing CO2 into the air delivery system. This can be done manually (while the cultures are illuminated), pulsed intermittently using a timer and solenoid valve, or, most effectively, by using a pH monitor/controller.
Inoculum
Most hatcheries will culture several species of microalgae to provide live feeds with different sizes and nutritional characteristics, depending on the animal being cultured and its life stage. The culture protocol for each species will be dictated by the characteristics of the microalgae (e.g., growth rate and environmental requirements), harvest yields, and use requirements.
Maintaining and Transferring Stock and Starter Cultures
Stocks of monospecific (uni-algal) cultures can be obtained by collecting local species, separating them by size (filtration) or density (centrifugation), and inoculating agar plates containing enrichment media. From these multi-species algal cultures, individual colonies are selected through agar streaks, micropipette isolation, liquid dilution, or flow cytometer cell sorters (Fulks and Main, 1991). Culturing algae in highly filtered, autoclaved, enriched seawater in the presence of antibiotics allows bacteria- and protozoanfree pure cultures (axenic) to be isolated. However, the isolation and screening of local species is laborious and mono-specific cultures of most microalgae species used for aquaculture are readily available from research laboratories, commercial hatcheries, and vendors.
Stock cultures are kept in specialized maintenance media, which may be enriched seawater or nutrientenriched agar plates or slants, under closely controlled conditions of temperature and illumination. A special temperature-controlled area or room adjacent to the algal culture room is usually allocated for this purpose.
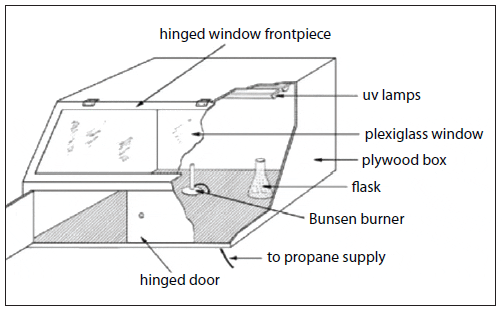
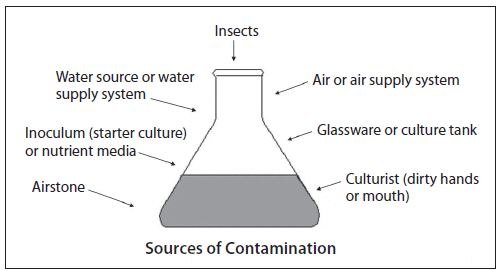
Stock cultures serve as inocula for the large-volume production of phytoplankton used for harvest or feeding. Stock cultures containing sterile, autoclaved media are kept in small, transparent, autoclavable containers such as 25-mL test tubes or 250- to 500-mL borosilicate glass, flat-bottomed, conical flasks fitted with cotton wool plugs at the necks (or polyethylene beakers can serve as caps). They also are maintained in seawater agar medium impregnated with suitable nutrients in petri dishes or on slants in test tubes. Every effort should be made not to contaminate the stock and starter cultures with competing microorganisms. To minimize potential contamination, an enclosed culture transfer hood outfitted with a Bunsen burner and UV lights should be used (a laminarflow hood is preferred if available) (Fig. 4).
The sterile procedures described below should be followed.
- Wipe all inner surfaces of the inoculating hood and working surfaces with 70 percent ethanol.
- Place all flasks that will be used in the hood, including flasks to be transferred from (the transfer flask) and flasks containing sterilized media that will be inoculated under the culture transfer hood.
- Irradiate flasks to be inoculated with an ultraviolet lamp for at least 20 minutes. Be sure the hood has a dark cover over the viewing glass (UV radiation can be damaging to the eyes).
- Switch off the UV lamp; ignite a small Bunsen burner; remove caps from one transfer and one new flask; and flame the neck of each flask by slowly rotating the neck through the flame.
- Tilt the neck of the transfer flask toward the new flask. In one motion, remove both stoppers and pour an inoculum into the new flask. Transfer approximately 50 mL for diatom species and 100 mL for flagellates. Avoid touching the necks of the two flasks. Never touch the portion of the stopper that is inserted into the flask. Once the inoculum is added, replace the stopper in the transfer flask. Slowly flame the neck of the new flask before replacing its stopper.
- Replace the cap over the neck of the new flask and use a waterproof marker pen to label the new flask with the algal species inoculated and the date of transfer.
- After all inoculations are completed, turn off the burner and transfer all new flasks to an algal incubator or a well-lit area in the algal culture facility. The remaining inoculum in the transfer flasks can be used to inoculate larger cultures such as 4-L flasks or carboys.
- Empty test tubes, flasks, stoppers and/or caps should be removed, thoroughly washed, and sterilized or discarded.
- Remove all materials from the working area and wipe the surface with 70 percent ethanol.
If you are transferring liquid cultures using glass Pasteur pipettes, follow these steps (Kawachi and Noel, 2005):
- Bring the pipette canister (used to sterilize the pipettes) close to the Bunsen burner, the cap removed, and gently shake it so that one pipette is extruded a few centimeters from the canister opening.
- Remove the pipette from the canister carefully so that its tip does not come in contact with the canister opening.
- Replace the canister lid. Place the pipette bulb adjacent to the Bunsen burner and clean the inside with 70 percent ethanol.
- Place the bulb on the pipette, pick up the cell culture vessel, and flame at an angle of at least 45 degrees.
- Remove the vessel from the flame, insert the tip of the pipette into the liquid, being careful not to touch the sides of the vessel, and collect the desired amount of inoculum by controlling the pressure of the bulb.
- Remove the pipette, orienting it in an almost horizontal position; reflame the mouth of the vessel, and replace the cap or plug.
- Using the same procedure, open the new vessel, flame the opening, and insert the pipette into the new vessel without touching the mouth.
- Slowly discharge the cell suspension, remove the pipette, flame the mouth of the vessel, and replace the cap.
- Remove the pipette bulb and place the used pipette into a discard container to be discarded or reused. Clean the bulb with 70 percent ethanol for reuse.
- Once all transfers are completed, turn off the Bunsen burner, remove all materials from the working area, and wipe the surface with 70 percent ethanol.
Progressive Batch Culture
The quantities of algae cells required for feeding mollusc larvae and other zooplankton are produced through a process called progressive batch culture (transferring small-volume cultures of concentrated inoculum into larger volumes of treated, enriched water). Starting with cells taken from an axenic stock culture (test tubes), microalgae are cultured in an enriched medium through a series of culture vessels of increasing volume (Fig. 5). The algae grown in each culture vessel serves as the inoculum for the next larger vessel, until the quantity of cells required for feeding is reached. This is a typical series for large-scale production:
- 25-mL test tubes (10-mL stock culture) inoculates….
- 500-mL flasks (250-mL starter culture) inoculates….
- 2.8- to 4-liter flasks (1,000-mL culture) inoculates….
- 20-liter carboys (16-liter culture) inoculates….
- 250-liter cylinders (180-liter culture) inoculates….
- 12,000-liter tanks (10,000-liter culture) inoculates….
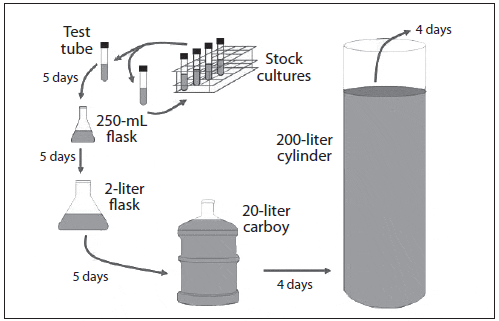
Starter cultures are used to inoculate “intermediate cultures” (2 to 25 L), which are used to inoculate even larger volume cultures for final production before harvest and feeding. Similar to stock cultures, starter cultures can be grown in 500-mL flasks with 250 mL of sterile medium; about 50 mL of the starter culture is transferred to similar volume flasks to maintain the line, while the remaining 200 mL are used to inoculate intermediate culture containers (typically from 4-L flasks to 20-L carboys) (Fig. 6).
Procedures for maintaining starter cultures are almost identical to those described above for stock cultures. A line of starter cultures is originally established from the stock culture of the required species. They are grown at 18 to 22 °C at a distance of 15 to 20 cm from 65- or 80-W fluorescent lamps, giving a level of illumination at the culture surface of 4,750 to 5,250 1ux. Small-volume cultures (test tubes to 1-L flasks) are usually manually shaken daily to facilitate gas exchange and mixing. Aeration is required for 2-L flasks and larger volumes, and in-line filters on the delivery tubing are necessary to prevent contaminants that can be introduced through aeration. Starter cultures are generally aerated with an air/CO2 mixture to maintain a satisfactory pH and provide additional carbon for photosynthesis. When CO2 is used, the pH is usually maintained between 7.5 and 8.5.
Stock cultures are grown for varying periods before inoculation in 500-mL flasks. For diatom species this period is 3 to 5 days; for the majority of flagellates it is 7 to 14 days. When ready for use, 20 to 50 mL of the starter culture (depending on species and cell density) is transferred to a fresh 250-mL culture to maintain the starter culture line. The remainder is used as inoculum for larger cultures (usually 1,000 mL in 2.8- to 4-L flasks) to be grown for feeding or as an intermediate step in large-scale culture, where they are used as inocula for 20- to 40-L cultures. To maintain high-quality cultures, transfers should be made during the exponential growth phase, with an inoculum of at least 10 to 20 percent of the total volume or an initial concentration of about 105 cells/mL, to promote rapid population growth.
Throughout the scale-up process, contamination is a constant threat and cleanliness and attention to detail are critical. Contaminants may be chemical or biological and they can originate from one or several sources. A common chemical contaminant is residual chlorine from the sterilization process, while biological contaminants might include: 1) excessive levels of bacteria (indicated by cloudy water), 2) protozoans or rotifers (culture water turns off color and clears), 3) competing microalgae (color change or crust attached to culture vessel walls), and 4) macroalgae (green or brown strands attached to culture vessel walls). Identifying bacterial and microalgal contaminants usually requires 100X to 400X magnification, while protozoan contamination can be observed under 15X to 40X magnification (Hoff and Snell, 2008). Possible sources of contamination are shown in Figure 7.
Estimating Algal Density
Estimating algal density is an inherent part of any algal production system. Algal biomass is the criterion used to determine when to transfer inoculum through serial dilution to larger volume cultures and to determine harvest volumes of cultures in production. For stock and starter cultures, the most accurate measurement of cell density can be made using a Palmer-Maloney slide or a hemacytometer.
The chamber of the Palmer-Maloney slide is without rulings and is circular. It is 17.9 mm in diameter, 400 ?m deep, and has an area of 250 mm2, for a total volume of 0.1 mL. Even very small microalgae at low concentrations (10 per mL) can be detected. Hemacytometers are thick glass slides with two chambers on the upper surface, each measuring 1.0 x 1.0 mm. A special coverslip is placed over these two chambers, giving a depth of 0.1 mm and a total volume in each chamber of 0.1 mm3. The base of each chamber is marked with a grid to aid in counting cells within the area (Fig. 8). Before counting motile algal species, one or two drops of 10 percent formalin should be added to a 10- to 20-mL sample of the culture to be counted. With the coverslip in position, one or two drops of the algal sample are introduced by means of a Pasteur pipette to fill both chambers.
The central grid of each chamber is subdivided into 25 squares, each measuring 0.2 x 0.2 mm; these are further subdivided into 16 squares (0.05 x 0.05 mm). Therefore, the volume of each grid is 0.2 x 0.2 x 0.1 mm = 0.004 mm3. To determine cell density:
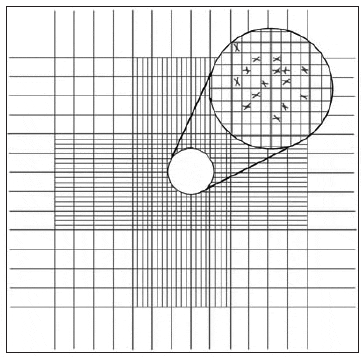
- Count the number of cells in ten randomly selected 0.2 x 0.2 mm grids and calculate the average (as an example, an average of 42.5 cells/grid).
- Multiply the average (42.5 cells) by 250 to get 10,625 cells/mm3 (0.004 mm3 x 250 = 1 mm3).
- Since there are 1,000 mm3in 1 mL, multiply the value in the second step by 1,000 to get cells/mL. 42.5 x 250 x 1,000 = 10,625,000 cells/mL, 10.625 million cells/mL (10.62 x 10⁶).
The Coulter Counter, now called a “multisizer,” was originally developed to count blood cells. Algal cells pass through a small aperture (2 to 10 ?m) and a slight electrical current travelling between two electrodes. Each time a cell passes between the electrodes, the current is impeded and the cell is counted. The advantages of the Coulter Counter are its accuracy and efficiency; the disadvantages are that it does not discriminate between algal cells and other particles, dense culture needs to be diluted to get an accurate count, and they are expensive.
For larger cultures, a spectrophotometer or fluorometer that measures the chlorophyll ? content in an algal culture can be used to obtain a quick approximation of cell density. Graphs comparing cell density and readings on either instrument must be prepared for each algal species. However, the chlorophyll ? content in an algal cell is not constant and varies with the nutritional state of the cell. This will affect the accuracy of cell density estimates derived with these instruments.
An inexpensive way to estimate algal density in large cultures is to use a “Secchi disk,” a technique that has been used by field biologists for decades. Once calibrated to the microalga species in culture, Secchi disks can provide a reasonably accurate estimate of algal cell density (Hoff and Snell, 2008).
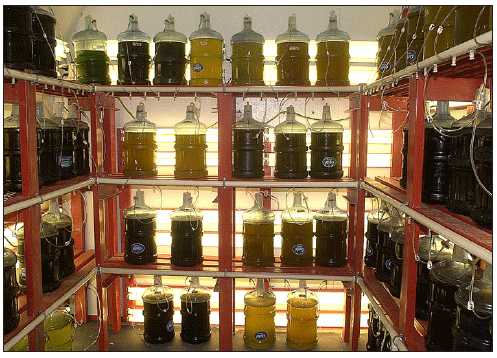
Intermediate Culture
Intermediate culture volumes, typically 4-L flasks to 20-L carboys, are used to inoculate larger vessels, typically 100- to 200-L translucent fiberglass cylinders or polyethylene bags, or even larger fiberglass tanks and raceways. The complexity of the culture operation depends on the requirement for algae and cost constraints. The simplest culture system may be just a scaled-up version of the starter cultures using 4-L flasks or 20-L carboys. Sterile, nutrient-enriched seawater with an inoculum should be aerated with a mixture of 2 percent CO2 carried in compressed air. Illumination for culture growth is provided by fluorescent lamps, usually mounted externally to the culture flasks. The number of lamps used is determined by the height and diameter of the culture vessels, with the object of providing 15,000 to 25,000 lux measured at the center of the empty culture container. Two 65- or 80-W lamps are sufficient to illuminate 3-L glass flasks, which are about 18 cm in diameter, whereas five lamps of the same light output are necessary for 20-L carboys (Fig. 9).
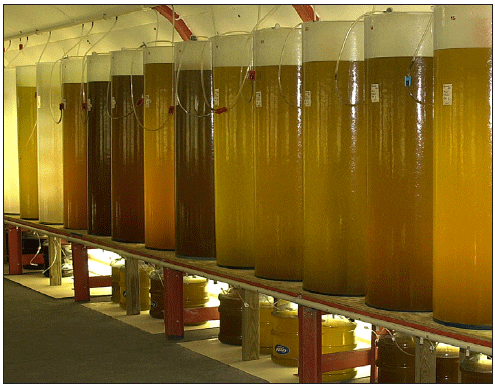
Cultures 4 to 8 days old from carboys (20-L) are used to inoculate 200-L translucent fiberglass cylinders or polyethylene culture bags. In most cases, these larger volume cultures are housed in greenhouses and receive natural light (adequate illumination from fluorescent bulbs is usually cost prohibitive). The vessels are filled with filtered, UV-irradiated, and usually chlorinated/dechlorinated seawater, enriched and inoculated. Each cylinder is carefully labeled to document the date of the sterilization process, the enrichment, and the species inoculated. Under optimal environmental conditions, the culture will be harvested in 4 days or used to inoculate large-scale cultures in tanks or outdoor ponds. (Fig. 10).
Batch, Semi-continuous, and Continuous Culture Systems
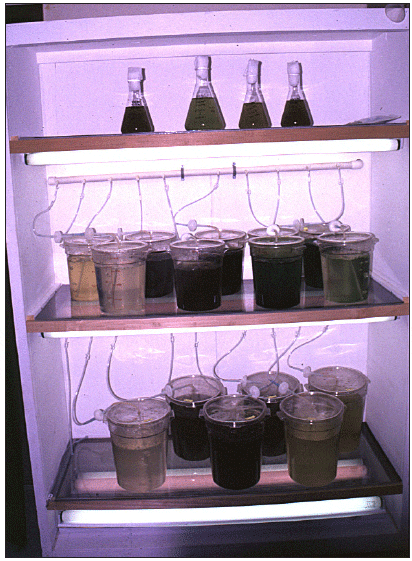
Because microalgal culture produces high concentrations of cells, most laboratories require only small volumes of algae for food. These can be cultured in 4-L containers or 20-L carboys using “batch” culture protocols. Commercial hatcheries, which require much larger volumes of algae, often use semi-continuous or continuous culture systems.
Batch cultures are inoculated with the desired species that will grow rapidly under optimal conditions until the rate of cell division begins to decline, indicating the transition from the exponential phase to the stationary phase. At that point, the culture is completely harvested and the container is washed, refilled (with sterilized, enriched medium), and inoculated to begin a new culture. Batch culture is generally used for delicate species or for rapidly growing diatoms. Although batch culture is considered the least efficient method of production, it is predictable, and contamination is less likely than in semi-continuous cultures that stay in production through several harvests. Because the entire culture is harvested, yield per tank is less than in semi-continuous systems; therefore, more tanks are required for the same level of production (Fulks and Main, 1991).
Semi-continuous cultures begin much the same way as the batch cultures, but instead of harvesting the entire volume, 25 to 50 percent of the volume is harvested at the point when light has become a limiting factor (late exponential phase). The harvested volume is then replaced with freshly prepared culture medium and the remaining algal cells serve as inoculum. Semi-continuous cultures grow rapidly and can be harvested every 2 or 3 days. In this way, the life of a culture can be extended; cultures of some hardier species, such as Tetraselmis suecica, will last for 3 months or more with harvests of 25 to 50 percent of the culture volume three times each week. Semi-continuous culture is mainly used with hardier species of flagellates. Semi-continuous cultures may be grown indoors or outdoors. Their longevity is unpredictable, especially outdoors, because competitors, predators, bacteria and/or other contaminants and metabolites build up and render the culture unsuitable (Guillard and Morton, 2003).
Droop (1975) defines continuous culture as “steadystate continuous flow cultures in which the rate of growth is governed by the rate of supply of the limiting nutrient.” Continuous culture systems are delicately balanced so that culture organisms are harvested continually and the nutrient-enriched media is replenished continually, consistent with the growth rate (sustainable yield) of the culture.
In order to harvest algae continuously at a level adjusted to the maximum specific growth rate (exponential phase) of the culture species, two monitoring and control devices can be used—chemostats and turbidostats. In both cases, fresh, sterile media enters the culture vessel, displacing old media and algal cells that are harvested through an overflow port. Chemostats act on the principle of limited nutrients, so if the concentration of the limiting nutrient (e.g., nitrate) falls below a certain level, a fixed quantity of nutrient solution is added; algal growth rate is regulated by the limiting nutrient, not cell density, and flow is continuous (James et al., 1988). Turbidostats have photoelectric monitors connected to solenoid valves that control the withdrawal of algal suspension and the addition of fresh medium as a function of cell density (by measuring turbidity); the flow is not continuous. A variety of mathematical models have been developed that, theoretically, can maximize production from continuously harvested systems (based on algae growth rate, optimum dilution rate, and nutrient concentration), but in practice the culture manipulations are determined empirically after a series of several trials (Sorgeloos et al., 1976; Laing and Jones, 1988; Landau, 1992).
Culture in Polyethylene Bags
Heavy-gauge polyethylene tubing can be cut to a suitable length and one end heat-sealed to form a sterile, flexible culture container that is either a cylinder or an oblong bag (Baynes et al., 1979; Trotta, 1981). The culture vessel design is based on that used by SeaSalter Shellfish Company Ltd. (Farrar, 1975). Containers formed in this way can be strengthened by supporting them within a plasticcoated, steel-mesh frame (Fig. 11). Or, the cylinders can be suspended, with or without lateral support mesh, if the diameter of the bag is less than 30 cm and the height less than 200 cm.
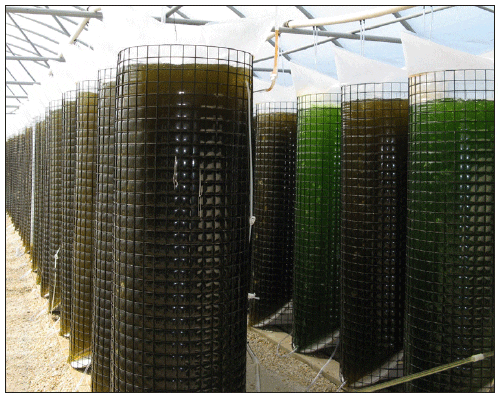
Continuous microalgal culture in polyethylene bags has several advantages: 1) a sealed container is less likely to become contaminated than a rigid container with an open top or lid; 2) bags do not require daily maintenance and cleaning; and 3) they cost less to install and use space more efficiently. Bags are the least expensive way of constructing large-scale culture vessels. Such containers can be used indoors with artificial illumination or outdoors in natural light. Polyethylene bags have a relatively short lifespan because the internal surface attracts culture debris and bacteria that reduce light penetration and are a source of contamination. At the end of a culture run, it is necessary to replace the bag.
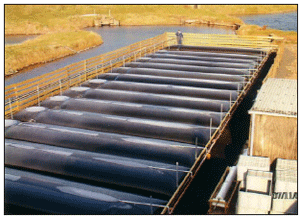
Large-scale outdoor bag cultures are often positioned horizontally to maximize sunlight penetration (Fig. 12). Such large-volume systems are often used to induce multi-species blooms that are best suited for feeding juvenile shellfish in nursery systems or adult shellfish in broodstock systems, rather than for hatchery production. The rate at which a bloom develops is related to the species composition; the volume and cell density of the inoculum; the quantity, quality and duration of light; nutrient levels; and temperature.
Concentrating Algal Biomass
In most hatcheries, microalgae are fed in liquid form directly to the animal culture tanks. Recently, though, there has been an interest in concentrating algae to reduce the volume of microalgal culture water (and possible contaminants) introduced into culture tanks. The use of “algal paste” or concentrate has gained popularity because during periods of excess production, the concentrate greatly reduces the physical space required, can be refrigerated until needed, and can be diluted when used. However, the nutritional quality of the microalgae may be a concern if the concentrate is stored for extended periods. Although this concept is not new to aquaculture (Barnabe, 1990), algal paste in preserved or fresh forms recently has become commercially available.
For small-scale harvests, filter screens or cartridge filters (1 to 5 ?m) are effective. The concentrated cells are washed off with limited water and then used, refrigerated or preserved (Hoff and Snell, 2008). Chemical flocculation using natural organic agents such as gelatin, chitosan, and sodium alginate can be used to concentrate microalgae to feed benthic detritus feeders and crustaceans. Centrifugation is used to concentrate large-volume cultures. Continuous- flow centrifuges (e.g., Sharples PenwaltTM) are used to concentrate microalgal cultures into paste. Both chemical flocculation and centrifugation have proven suitable in terms of efficiency and cell density when preparing concentrations for aquaculture feeds (Heasmann et al., 2000).
Advanced Algal Production Systems
There are several new microalgal production systems on the market; they are collectively termed “AAPs” (Advanced Algal Production Systems) or photobioreactors. Photobioreactor systems can provide higher algal densities, more efficient space usage (a smaller footprint), continuous or semi-continuous production, longer production cycles with less contamination, and lower labor requirements (Ellis and Laidley, 2006). In general, three types of systems are under production: 1) tubular photobioreactors, 2) column or cylinder photobioreactors, and 3) flat-panel or plate photobioreactors (Tredici et al., 2009).
Closed photobioreactor systems have several advantages over conventional tank-based or pond microalgal productions systems. Still, they have limitations, such as overheating, oxygen accumulation, biofouling, and shear stress (Ellis and Laidley, 2006). Many of these designs are still under evaluation, so the reader is advised to review the specifications of these systems, including purchase and construction costs, operational efficiency, practical application to your production needs, etc. (Anderson, 2005; Tredici, et al., 2009).
Conclusion
Phytoplankton culture is a multi-faceted activity, and the task of designing a large-scale microalgal production system can be complex. The size, location, and engineering specifications should depend on the type of culture to be practiced (e.g., batch, semi-continuous, continuous), the site characteristics (such as water quality and temperature), illumination, the requirements of the target species, and production goals. These considerations are interdependent, and each should be treated as a part of the whole. The principles and methods described here represent only a few of many approaches to growing phytoplankton. The reader is advised to modify these guidelines as needed to suit specific hatchery conditions.