The importance of proper designs, construction and the need for involvement of experts during the process of setting up aquaculture production units is paramount. Ideally, production units should be designed in such a way to allow total control of:
- What gets in or out
- When its gets in or out
- How it does this
- How much gets in or out
- Rate of getting in or out
The production site is of great importance. It does not only dictate the fish species to be produced but also important, the cost of construction is directly related to the nature and location of the site. A good site should therefore meet the following criteria:
- Have water in quantity and quality needed for the proposed production
- Suitable topography to allow cost effective setting up the proposed production facility
- Have soil suitable for pond construction (if ponds are planned).
A simple test of the suitability of a soil for pond construction:
- Dampen a handful of soil with water. Use only enough water to dampen the sample (do not saturate it).
- Squeeze the sample tightly in your hand.
- Open your hand:
- If the sample keeps its shape, it is probably good enough for building a pond (sufficient clay present).
- If the sample collapses and does not keep its shape, it is probably not good enough for building a pond (too much sand present)
- The site be in a region or area that is suitable and allowed for aquaculture production
- Well drained and away from flood-prone areas or at least having potential for flood control
- Allow for acceptable effluent disposal as required by environmental management authorities
- Have a climate suitable for production of the intended species
- Have accessibility to a good and all-weather market
- Have easy access to services and technical assistance
- Have adequate room for intended investment and possible future expansion
- Not in a pollution prone area
The final size of a fish farm is determined by:
- Amount of water available for fish culture
- The technology to be employed; Intensive systems require less land compared to semi-intensive systems, to produce the same quantity of fish
- The target production
- Capital available for investment
The number, size and the shape of ponds will be determined by:
- Land size
- Topography of the land
- Intended use of the pond
- The species to be produced
- Frequency of harvest
- Target quantity per harvest
- Whether juvenile production is intended etc.
For these reasons it is not always possible to give general recommendations on the sizes and shapes of earthen ponds. However, rectangular ponds are easier to manage. Fingerling ponds should be smaller than fattening ponds.
Pond Design
Once the site has been identified, surveyed and the producer has made decision on the number and sizes of ponds that will be needed when the farm is fully operational, it is time to make a decision on the design of the ponds.
During the process of designing ponds, decisions on the following should be made:
- Total area of the pond water surface (this is the actual pond size)
- The length and the width of the pond water surface
- The water depth and the total pond depth at the deep end
- The slope of the dykes and the pond bottom
- The size of the free board (height of dyke above water level)
- The width of dykes
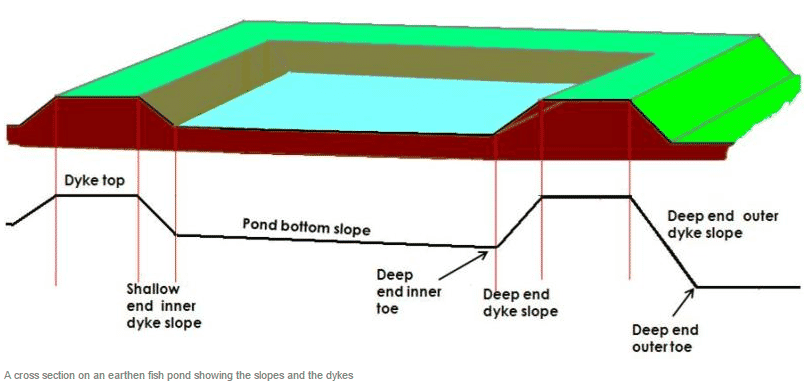
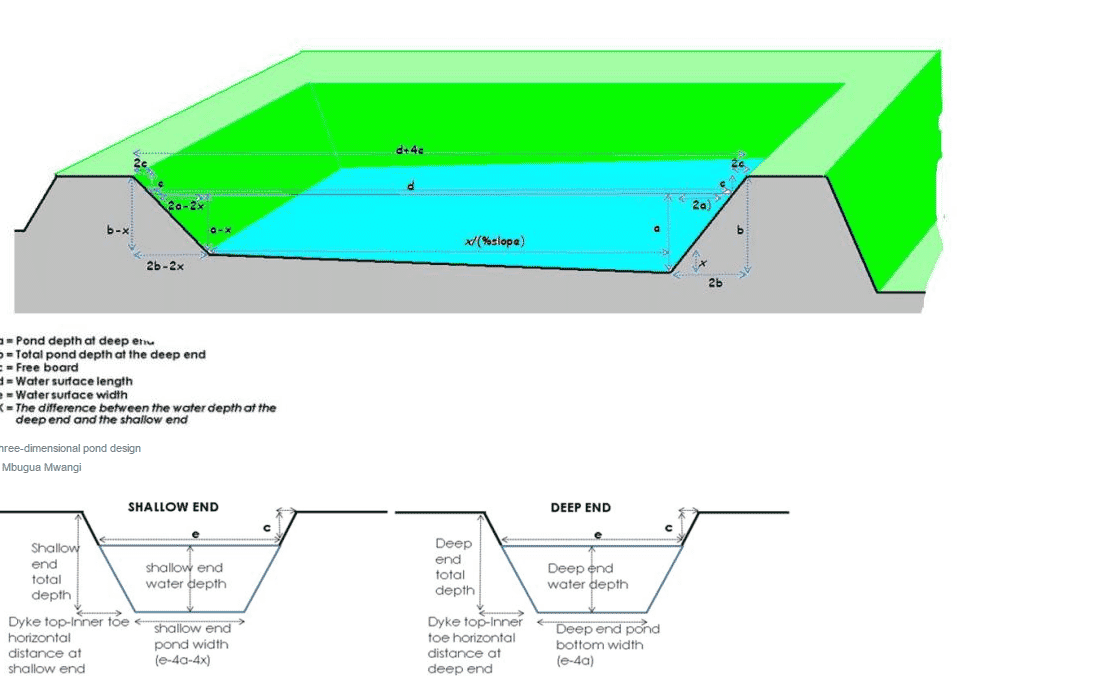
Once this is done, all other pond dimensions can be calculated. The diagram below gives the relationships between various pond dimensions.
Calculations for the following design are based on the assumptions that:
- Dyke slope: 50% (0.5)
- Bottom slope: 1% (0.01)
Based on the above, the following apply:
Total pond length d+4c
Total pond width e+4c
Shallow end water depth a-x
Shallow end total depth b-x
Shallow end bottom width e-4a-4x
Deep end bottom width e-4a
Dyke top-Inner toe horizontal distance at deep end 2b
Dyke top-Inner toe horizontal distance at shallow end 2b-2x
Steps in the construction
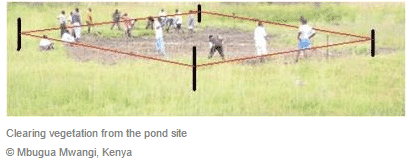
Step 1. Mark out the area that the pond will occupy using wooden pegs and strings and then remove all the vegetation.
Step 2. Remove the top soil and keep it in a good location close to the site. It will be used to cover the pond bottom and the dyke tops to enhance fertility. Remember that if the soil is kept far away, this will increase the cost of pond construction since the soil will need to be brought back.
Step 3. Clear the area within the pond limit of all vegetation including the area within 10 m of dykes and pond structures and any access, water supply or drainage area.
Step 4. Establish a Temporary Bench Mark (TBM). A bench mark is a mark on the ground that establishes the elevation of a place and is used as a reference point for all other elevation. This will allow you to determine and check by use of levelling equipment (e.g. spirit level) the elevations of the dykes, canals and other structures. The TBM should be set and permanently fixed in a protected location during the whole construction period.
Step 5. Using spirit level, measuring tape, pegs and strings, mark out:
- The dykes
- Dyke slopes
- Inner and outer toes
- The pond bottom

Step 6. Using the determined pond depths and the actual elevations of the site, determine which areas need digging and which need filling. This is very important because it eliminates unnecessary movements of soil and thus keeps the construction cost at a minimum.
Step 7. Dig out the soil at the 'dig' areas and place it on the 'fill' areas. Most of the fill areas will be on the dyke position. Make sure to remove boulders and tree stumps from the pond area.
Step 8. Once the soil is placed on the fill area, make sure that this soil is properly compacted. To achieve good compaction, place soil in layers not exceeding 15 cm in height and compact back to at least 10 cm. When constructing dykes, soil layers are place 20 cm inside on top of each other to reduce amount of work during dyke cutting.
Good dykes should:
- Be able to resist water pressure resulting from the pond water depth
- Be impervious
- Be high enough to keep the pond water from overflowing
To determine the height of the dyke to be built, take into account:
- The water depth you want in the pond
- The freeboard (upper part of a dyke that is never under water). It varies from 0.25 m for very small ponds to 1 m for very large ponds
- Dyke height that will be lost during soil settlement. This varies from 5 to 20 percent of the construction height of the dyke
- Dyke width depending on the water depth and the role the dyke will play for example transportation in the farm
- It should be at least equal to the water depth, but not less than 0.60 m in clay soil or 1 m in somewhat sandy soil
- It should be wider as the amount of sand in the soil increases
Dyke slopes should be determined bearing in mind that:
- Steeper slopes erode easily
- The more the soil becomes sandy, its strength decreases, and slopes should be more gentle
- The bigger the pond size, the stronger is the erosive power of the water waves
- As the slope ratio increases, the volume of earthwork increases, and the overall construction cost and the land area required for the ponds increases
Note that the more gentle the slope, the more solid the pond, but very gentle slopes make ponds more expensive and make rooted weeds control difficult. A slope of 50% is the minimum recommended.
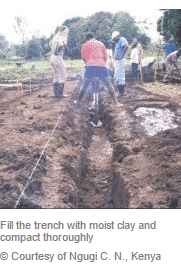
The ability of the dykes to hold water can be enhanced by:
- Using good soil that contains enough clay (about 25% clay is best)
- Building a core trench (clayey core) within the dyke where the soil is pervious
- Building a cut-off trench when the foundation is permeable
- Proper compacting of the soil
- Ensuring that the thickness of the dyke is appropriate
Newly built dykes should be protected against erosion by planting a grass cover on the crest of the dykes, on outer slope and on the free board.
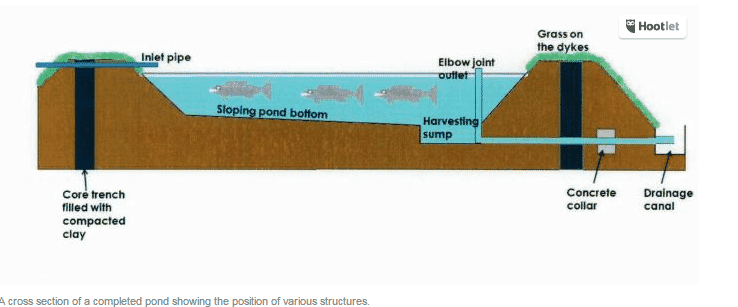
The pond bottom should be constructed such that water drains towards a harvesting sump at the deepest part of the pond, in front of the outlet, where all the fish can be concentrated during complete draining of the pond.
Water Intakes

Main water intakes are used for the overall regulation and transportation of water to the fish farm. They ensure constant supply of water and allow regulation of the amount of water to the farm allowing for diversion of what is not needed.
When setting up main the intake, consider:
- The levels of the water source (river, stream, etc.) in relation to the elevations of the water supply structure and the ponds themselves and where the water will eventually leave the farm.
- The depth from which you want to take the water (surface, lower levels or the complete depth of the water supply source) at the intake
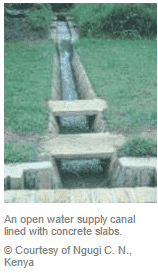
There are several types of canals depending on their use:
- Feeder canals to supply water from the main water intake to the fish ponds
- Drainage canals to take away water from the fish ponds
- Diversion canals to divert excess water away from ponds
- Protection canals to divert water runoff/floods away from the fish farm
All canals should be well designed to have the required water carrying capacity at the required rate. If the water quantity is low and the rate of delivery is slow, pond will take too long to fill.
Pond Inlets
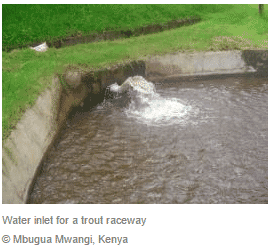
There are two common types of inlet structures used in Kenya:
- Pipe inlets
- Open inlets
When designing and constructing an inlet:
a) Place the inlet at the shallow end of the pond
b) Make sure that the bottom level of the inlet is at the same level as the bottom of the water feeder canal and at least 10 cm above the maximum level of the water in the pond
c) Design the inlet structure to be horizontal, without a slope.
d) Make it wide enough to fill the pond completely in reasonable time
e) Make it such that water splashes and mixes as much as possible when entering the pond.
f) Provide a screen to keep unwanted fish and other organisms out
g) Control mechanism e.g. gate valves
Pond Outlets
Pond outlets are built to:
- Keep the water in the pond at its optimum level, which should be the maximum water level designed for the pond
- Allow for the complete draining of the pond and harvesting of the fish when necessary
A good outlet should ensure that:
- The time needed to drain the pond completely is reasonable
- The flow of the draining water is as uniform as possible to avoid disturbing the fish excessively
- Fish are not lost even during the draining period
- Water can be drained from any pond levels
- Allow for overflow of excess water
- Can be cleaned and serviced easily
- Construction and maintenance costs are kept at a minimum
In most cases, outlets have three main elements:
- Water control plugs, valves, control boards, screens or gates
- A collecting sump inside the pond, from which the water drains and into which the fish is harvested
- A conduit through the dyke through which the water flows out without damaging the dykes or the drainage canal
For small rural ponds, investing in elaborate outlets may not be necessary. Complete drainage of the pond can be done by cutting the dyke open at one of the deepest point of the pond. Repairing the dyke should not take more than two hours.
Materials that can be used to construct pond outlets and inlets include bamboo poles, PVC pipes, wood, bricks, cement blocks or concrete.
Pond Construction Costs
Through experience in Kenya, one pond of 100 m2 will take 15 people about 8 days to complete, working 8 hours a day.
This will cost 15 x 8 x KShs X
X = wages per day
Note that the construction cost will vary with soil types and the weather. Rocky soils are hard to work on and construction will be more expensive. Black cotton soils are very difficult to work on during rainy weather and this too will increase construction cost.
Inlet canal and outlet canal: Include the cost of cement, sand, pipes, valves etc. Consider other incidentals costs especially due to the nature of the site and the prevailing weather.
Available pond construction experts in Kenya charge bout KShs 150 to 500 per square meter of pond depending on the soil type and weather (2009 rates).
This should give the total cost of constructing one pond but not setting up the fish farm.
Remember that many but small ponds are more expensive to construct as compared to a few but larger ponds. Small ponds also waste a lot of space in comparison. However, very large ponds take long to fill and drain and are also difficult to manage.
You might also be interested in:
- Hatchery Management and Tilapia Fingerling Production
- How to Achieve Good Water Quality Management in Aquaculture
January 2015
This article was taken from Infonet-Biovision.org.